Lab 3
Summary
This lab will introduce you to the creation of outdoor worlds
Learning Outcomes
- terrains and how they are built
- terrain layers
Submission Requirements
Show Cathy or Hasan
Instructions
In this lab you will be creating an outdoor environment using UDK's landscape tool. The environment will feature land at different heights, the use of different landscape materials and other decorations.
UDK has 2 methods of creating terrain. Their uses are a bit different. The old method is called terrain and you can find out more about it here
We will however be using the new method of terrain creation called Landscape.
To access the landscape editor, use this icon:  . Notice it is the mountain with the L in it. The mountain without the L is the old terrain editor.
This will bring up the landscape menu.
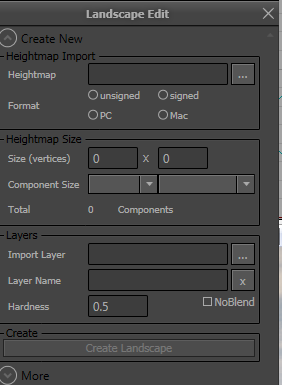
To create a landscape, we need to specify the size and subdivisions. For now use: 255 and 255 for vertice. Once you hit enter on the second value for number of vertex, it will fill in the other pieces and enable the "create landscape" button. Hit the create landscape button:
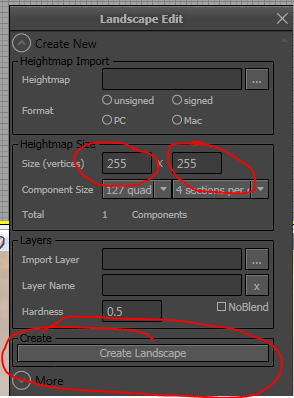
At this point you should see that your world now has a big flat plane on it.
Now, what we want to do next is to create a some ground textures. There are some in UDK, but if you wish you can get others from the internet. If you are importing textures though, you need to remember that textures sizes has to be powers of 2. So a file that is 300 X 300 is not going to work. You will need to resize the image in an application like photoshop to a power of 2 size (such as 256 X 256).
For example, here is a package that has quite a big collection of textures that are tileable and seamless (does not look disjoint when you put it side by side like tiles). However the the images are not power of two so you will need to adjust them.
Adjusting an Image
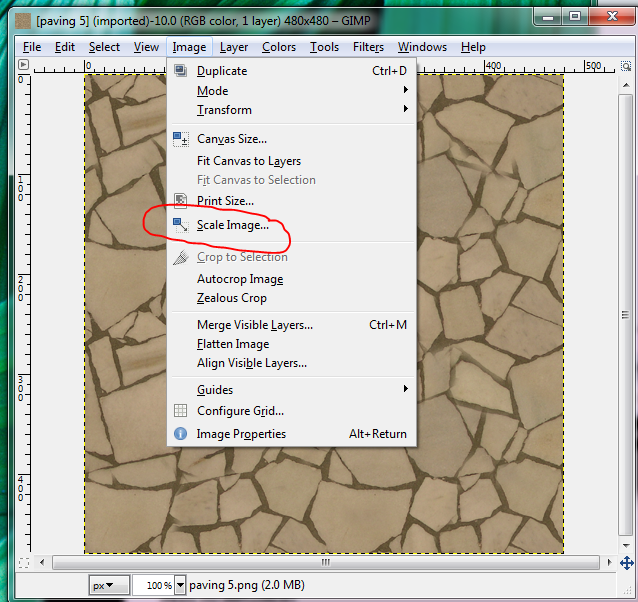
Use an application like gimp or photoshop. The schools computer has photoshop but if you do not have it and don't want to buy a copy then gimp is a good open source alternative. To adjust the image using gimp, open the file, go to image menu--> scale image.. and set the size. In general scaling down (making it smaller) gives better results. Once you are done, choose export from file menu and export it as a .bmp file (note that unreal does support other formats... just choose one it supports.
Creating a Terrain Material
In any case choose any 3 textures you wish to use, scale them properly and bring them into unreal.:
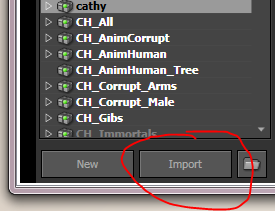
- click import button
- choose the file you are importing
- fill in info as necessary
Once they are in create a new material with the samples that you had imported as texture samples. This is done by doing the following:
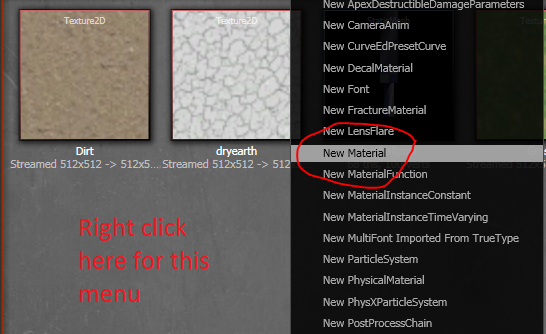
- right click in the grey part of your content browser in the package where you want the material to go and choose new material
- fill in the package, group and name for your material as appropriate
- go to content browser and select a texture
- double click on the new material you had created to open the material editor
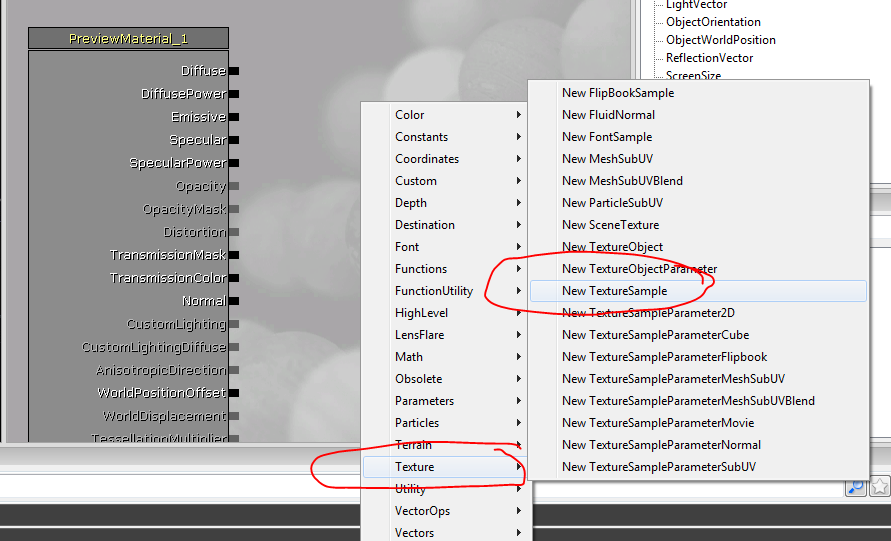
- in the material editor, in the grey part to the right side, right click and choose texture-->new texture sample:
- Repeat for each texture.
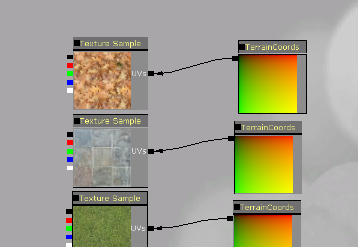
Now, once you have done that we will create texture coordinates for the material. These allow you to specify scaling and tiling offsets.
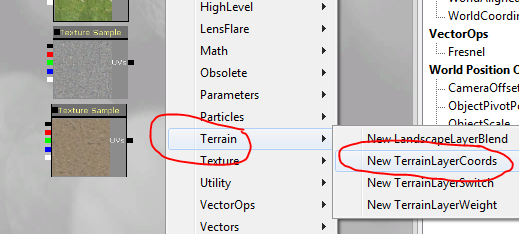
- right click in the grey to the right of the texture sample choose Terrain-->new TerrainLayerCoords
- drag the uv from a texture to a TerrainLayerCoord object. The objects represent how the texture will be scaled and tiled.
- repeat if you want different mappings for each of your textures. Otherwise hook them all up to the same coord object
- To change any of the tiling/scaling of the texture, double click on the associated TerrainCoord object and modify the parameters:
Next, we will set up terrain layers:
- right click in material editor in grey area and choose Terrain-->new TerrainLayerWeight
- repeat for each texture. alternatively you can copy and paste the first one
- for each TerrainLayerWeight, double click to change it
- The layer name should be something that you can associate with the texture
- the preview weight should be 1 for normal weight, higher to make it a "heavier" texture in the blend
Hook up the pieces as described here:
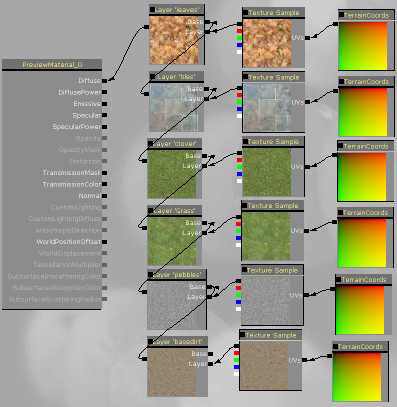
Once you are done save your package.
Now we will edit the landscape and apply the texture to it.
- right click anywhere on the landscape to bring up the context menu and choose landscape properties
- in the content browser make sure you have the landscape material you wish to apply selected
- click on the left arrow beside the Landscape Material property (this may take a minute and the material will look black in your viewport)
- Now, at this point you should see that your land has turned to a black or grey. The reason is because you haven't actually applied any of the layers of the material to your landscape yet. To do so you must set up layers.
To set up layers in landscape editor
- open the landscape editor (click mountain with L in it)
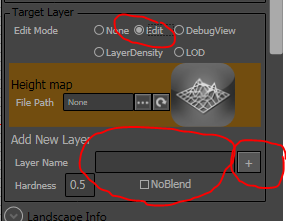
- scroll down until you see the section labelled Target Layerand click on the edit radio button
- This will add put in a section for adding a new layer. In the Layer Name, type in the name that you used for a layer in your material and hit the + sign
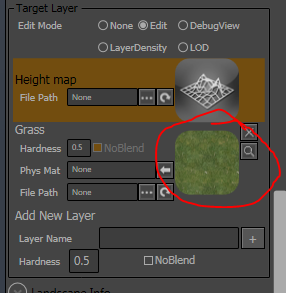
- You will know you did it correctly if a sample image for that layer shows up in the sample box. Another Add New Layer section is automatically added for the next Layer
- pick the texture that will be the most common throughout your scene click change your brush to the component brush, make sure that you have paint as your paint tool, then hold the ctrl key and left click in on the landscape and it will apply that texture throughout. Note that it may take a moment. Also note that your component brush will slightly alter the highlighting on your landscape so the colour may look wierd after you apply the material, change your brush and it will be as expected
- To add other layers, select the layer you wish to add, and ctrl click into the scene with your paint brush. The materials will blend together automatically. The more you press, the more the layer gets applied.
- To alter the height, choose heightmap in the layer target layer
- to lower with heightmap use ctrl-shift click. to raise use ctrl click
