Lab 4 Part 1
Summary
Welcome to your first UnrealScript lab! This lab will lay the foundation for your education in UnrealScript.
In this lab, you will:
- Deploy the startup package
- Initialize your labs repository with the required basics
- Create, compile, and test an UnrealScript actor and package
Learning Outcomes
- The development workflow relating to UnrealScript in GAM537
- How your git labs repository is to be used in this course
- The foundation of UnrealScript development
Files to Implement
- Hello.uc
Submission Requirements
To an instructor, show the following:
- Your compiled Foobar.u
- Your updated labs repository
Instructions
Deploying the quickstart project
We will use Visual Studio 2013 and nFringe version 1.3.0.5 to develop UnrealScript for the UDK. If you are doing this lab on a lab computer, VS2013, nFringe, and the UDK version February 2015 will already be installed. If you are doing this at home, ensure that the above 3 are installed noting that nFringe must be installed AFTER VS2013.
UDK source code
The directory where all UDK UnrealScript code resides is UDK-2015-01/Development/Src
We call this the development directory. Unlike other development environments, when developing for the UDK there is only one VS project that you will need and it will be placed in the development directory. We call this project the quickstart project and we will be providing it here.
Quickstart project
Download the quickstart project archive located here. Extract this folder to the development directory. In the development directory, in addition to many folders, you should have the following files:
- MyUdkProject.sln
- MyUdkProject.ucproj
- ScriptModifiers.xml
UnrealScript development overview
This is a good time to give you an overview of UnrealScript development. Open the provided solution file MyUdkProject.sln by double clicking the solution file. This should open visual studio 2013.
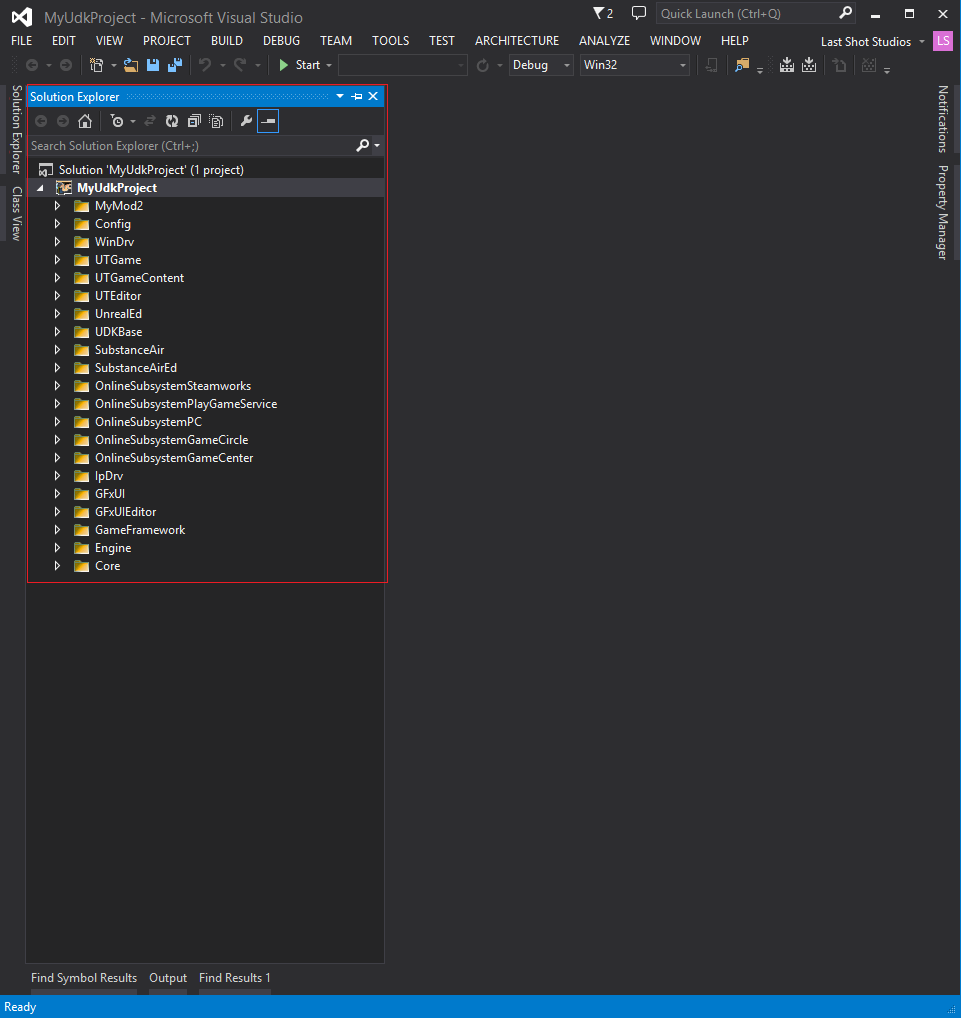
Open the solution explorer tab. You should see something like the following:

Most of the filters (in VS-speak, the "folders" underneath the project are called filters) are UnrealScript packages. In the UDK, code is organized into packages, each package containing a Classes directory and this directory containing a collection of UnrealScript files (.uc).
UnrealScript Breakdown
In Unreal, a single .uc file represents an UnrealScript class. This is closer to Java than it is to C++ in the sense that UnrealScript files are allowed to contain exactly one class. We will look at the details of .uc files in the second part of this lab on Thursday.
As stated above, a single UnrealScript file (.uc) is never compiled by itself. UnrealScript files are always compiled in packages; this is to make distribution of code to third parties more sane. UnrealScript packages can contain zero or more UnrealScript files.
Create a Foobar package
Let's learn how to create packages by creating a new package that we will compile. Do the following:
- Right click the project in the solution explorer (the project, not the solution!), highlight Add, click New folder.
- Name your new folder Foobar
- This will have created a new folder for you in the development directory
- As stated above, UnrealScript files must be located in a Classes directory that sits underneath the package directory. Right click your new Foobar package, highlight Add, click New Folder.
- Name your new folder Classes
Populate Foobar package with Hello.uc
- Right click your Classes directory, highlight Add, click New Item...
- From the template list, pick UnrealScript File
- Name it Hello
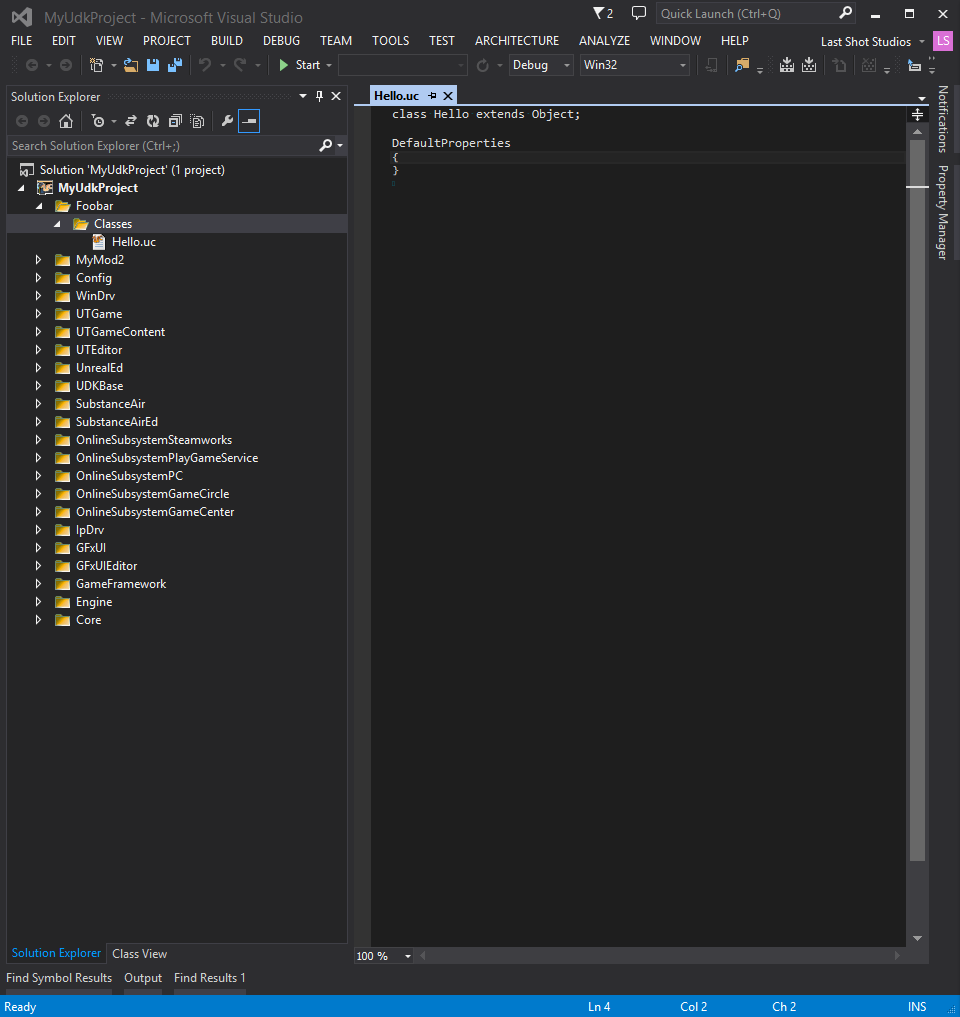
You should have something that looks like the following:

This is as far as we go with regard to coding today. If you have a solution that resembles the above, you're doing well. Now we will compile our Foobar package.
Updating configuration
Unlike other environments that you may be accustomed to, the UDK is configuration-file-heavy; meaning that it relies a lot on centralized configuration files. This is somewhat unfortunate because it inhibits more modular styles of development that you may be used to from other courses (eg placing .cpp and .h files wherever you like then informing the compiler to compile them or creating VS projects wherever you like and compiling/debugging them).
So, in UDK development, we will master the art of updating configuration files. Today, we will play around with DefaultEngine.ini.
If you've played PC games in the 90's or early 00's, you may be familiar with ini files already. Ini files serve as places where configuration settings are stored, divided into sections. Each section is identified by a leading tag like:
[NameOfSection]
Following the tag will be some number of configuration lines, each line typically broken down as follows:
<Append directive, eg +>ConfigOption=Value
- Open DefaultEngine.ini by expanding the Config filter in your solution explorer. Note all the lovely ini files! Today, we care only about DefaultEngine.ini so double click it
- Find the section UnrealEd.EditorEngine
- Append the following line at the bottom of the section:
+EditPackages=Foobar
The EditPackages lines tell the compiler which packages to compile. In this case, we're telling the compiler to compile your Foobar package. I also want to take a minute to explain why we have a + (plus) sign ahead of the line.
Default config files
The Default*.ini files are NOT actually the ini files that the UDK uses to load its configuration! They are in fact the base templates that the UDK uses to generate its ini files. In this case, DefaultEngine.ini is used to generate UDKEngine.ini. UDKEngine.ini is actually the file that the UDK reads.
So you might be wondering, why don't we modify UDKEngine.ini directly?
The answer is that the UDK will regenerate this file every time the Default*.ini files change or sometimes arbitrarily. This means that changes in the UDK*.ini files are not permanent which is why we put our changes in the Default*.ini files instead.
The reason why this whole mechanism exists in the first place is because multiple Default*.ini files are sometimes combined together during the generation of a UDK*.ini file.
Append directive
Since the Default*.ini files are used to generate UDK*.ini files, they contain special syntax to inform the configuration engine how certain lines should be treated. Here is a breakdown of the two forms that you will see today:
A line that does not start with any append directive, eg:
ConfigurationLine=ValueThis form of line will produce exactly one line like it in the output ini file. This means that if you have multiple configuration lines with the same configuration line name, the last one will be the one in the output file. For example, given the following input ini section:
FavouriteColour=Red
FavouriteColour=Green
Will produce the following output ini section:
FavouriteColour=GreenA line that starts with the + (plus) directive
This form of line tells the configuration engine to append this line to existing output. For example, given the same input as above, we get the following output:
FavouriteColour=Red
FavouriteColour=Green
Notice how each EditPackages=* line tells the compiler to compile a single package. Since we need to have multiple of these lines in the output ini, we prefix our added entries with the plus sign. We will learn at least one more directive later in the course.
Full List of Configuration Special Characters
Here's the full list of config file special characters, taken from the UDN:
Special Characters
+- Adds a line if that property doesn't exist yet (from a previous configuration file or earlier in the same configuration file).
-- Removes a line (but it has to be an exact match).
.- Adds a new property.
!- Removes a property; but you don't have to have an exact match, just the name of the property.
Note: . is like + except it will potentially add a duplicate line. This is useful for the bindings (as seen in DefaultInput.ini), for instance, where the bottom-most binding takes effect, so if you add something like:
[Engine.PlayerInput]
Bindings=(Name="Q",Command="Foo")
.Bindings=(Name="Q",Command="Bar")
.Bindings=(Name="Q",Command="Foo")
It will work appropriately. Using a + there would fail to add the last line, and your bindings would be incorrect. Due to configuration file combining, the above usage pattern can happen.
Compiling
There are many ways to compile. Today, we will learn how to compile through the command line.
- Open the command line. Hit the Windows key then type cmd then hit enter.
- The command line window should now be open. Navigate to the UDK binaries directory (UDK/UDK-2015-01/Binaries).
- If you are currently using a 64-bit OS (eg windows 8.1), cd into the Win64 directory. Otherwise, cd into the Win32 directory.
- This is a good time to make sure that you've saved the configuration changes to DefaultEngine.ini!
- Type:
udk make -debug
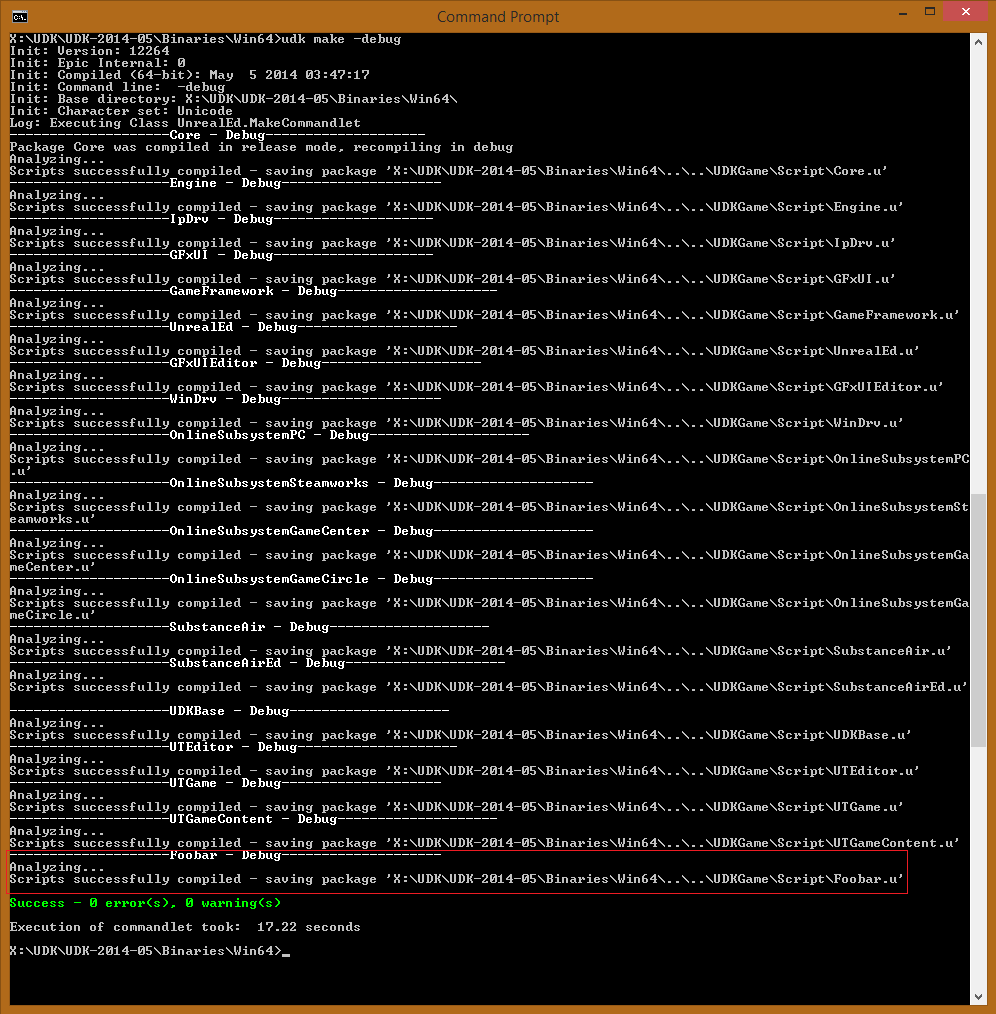
You should see something that looks like this:

Notice that at the bottom of the screen the output shows that the Foobar package was compiled. Verify that this is the case by visiting the script output directory:
UDK/UDK-2015-01/UDKGame/Script
You should be able to find the file Foobar.u here. This is your first UnrealScript package, congratulations! If you can't find it here, ask for help... There is likely a problem with your configuration file.
This is all that we need to do as far as compilation is concerned. In the future, this will be our primary way to compile in the UDK.
Linking your labs git repo
Linking your labs repo is simple, but not straight forward... There are many files in the UDK and we only need to track a few of them while ignoring many. Additionally, the locations of these files is inconvenient for us (as you will see in a minute) adding a further complication. Finally, synching the local directory with your repository must only update a few files and in-place as opposed to creating a new directory all-together. This means that our git workflow will be non-standard but this is something we will have to live with.
Make sure you hit Save-All in VS2013 a few times immediately before you do the following!
- Open git bash (windows key then type git or git bash)
- Navigate to the root UDK directory (cd /c/UDK/UDK-2015-01)
- Initialize a git repo (git init)
- Add your labs repo as a remote (git remote add origin https://github.com/Seneca-GAM537/ <your seneca id>.git)
- Add the following files to the staging area:
- MyUdkProject.sln (UDK/UDK-2015-01/Development/Src)
- MyUdkProject.ucproj (UDK/UDK-2015-01/Development/Src)
- ScriptModifiers.xml (UDK/UDK-2015-01/Development/Src)
- The Foobar package (UDK/UDK-2015-01/Development/Src/Foobar)
- DefaultEngine.ini (UDK/UDK-2015-01/UDKGame/Config)
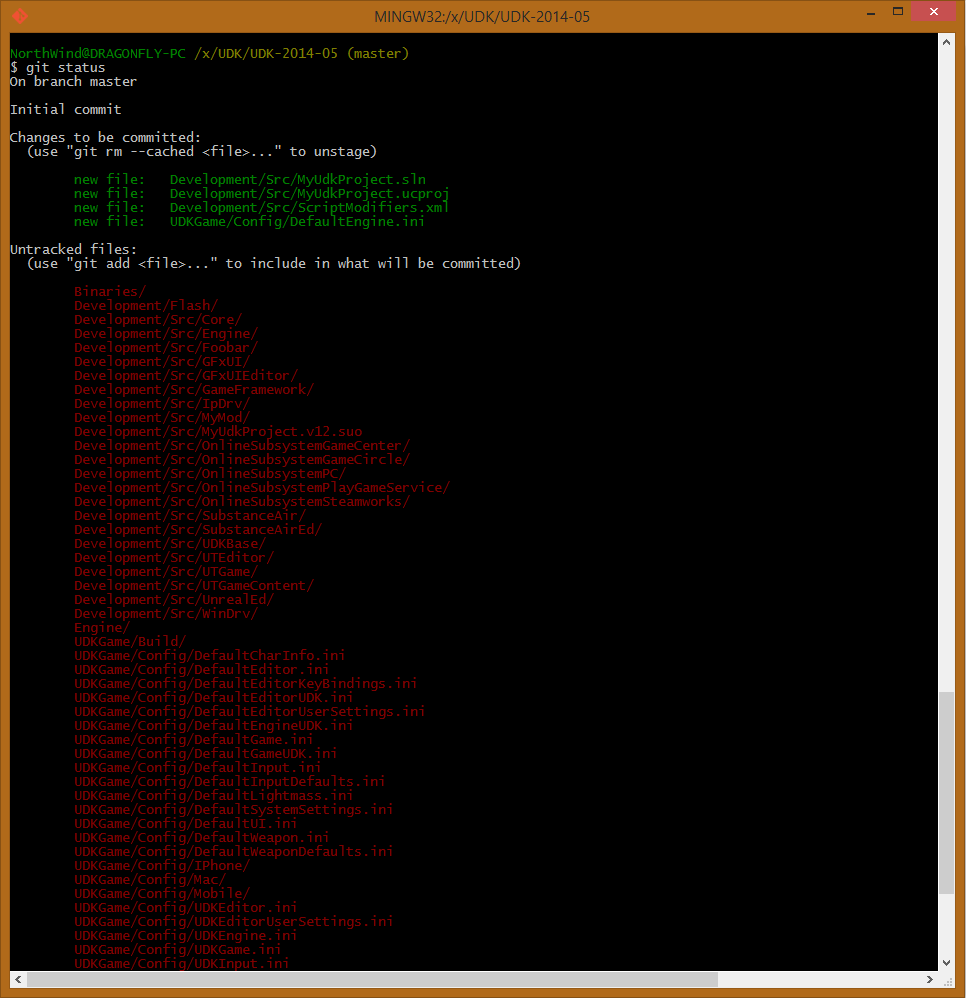
- Your staging area should look something like this:

- Note all of the untracked files, this is part of what I mean by inconvenient
- It is a good idea to develop a good .gitignore file to make your life easier. You can do this now if you wish or later on. When you do, add it to your repo as usual.
- Commit these files with a good message (git commit -m "<Use a good message here!>")
- Push up your changes (git push origin master)
Ensure that everything went correctly by viewing your repository's state on github.
That is all for part 1.